
There are a lot of places out there where you can buy (or sometimes get for free) digital scrapbooking stuff that you can use to design your backgrounds from scratch. Here are just a few websites:

I liked the owl, but I wanted something with leaves too.
Now, one big problem you're going to run into with some websites, is that they protect their backgrounds from being stolen by only giving you a small version of the picture when you click on it. You can get around this by going through that code that they give you to copy and paste into your blog to get the background onto your blog. There will always be a part of the code that says something like "background image". Look for that and then the link right after that will be the link to your image.
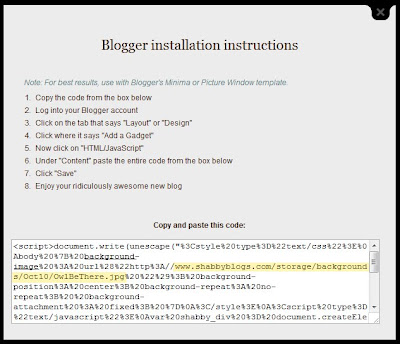
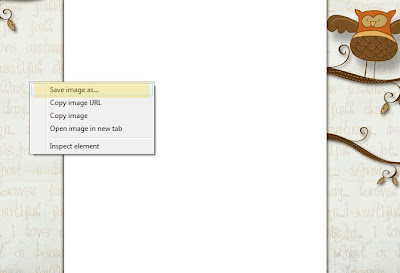
Copy and paste the entire link into your web browser and then from there you can right click on the image and save it to your computer.
Next you want to open the image in what ever editing software you are most comfortable with. I use Photoshop. And I'm not even that good with Photoshop so don't be too intimidated.
Now you have to decide what you want to do to your background. I usually add really simple things like foot prints and flowers.


 Then I made them a bit lighter.
 You can use the magic wand tool to select specific things. This is a lot easier than using the lasso tool, you just have to play around with it a bit to get the hang of it. Also you can hold down the shift and alt key to add or subtract to what you've already selected. This makes it so if you make a mistake you don't have to go all the way back to the beginning.
 Then use the free transform operation to make the shape smaller, or tilt it, or move it. You can either press ctrl t, or find it in the tool bar like I've shown here.

And as you can see on this background I've already added some cute little feet on the sides.
 Then I copied and pasted that flower shape over the top of it. Then I selected the outline of the shape.
 Now, comes the trick. You have to make sure and select the background, your pattern, as the active layer. Then you copy the selection.
 Now you have that cute flower shape, and it's in a cute pattern too.
 Now we just have to get the center. I used the replace color function to make the flower the same color as the purple in the pattern.
 Then I selected just the middle part.
 Copy and paste it on top of the flower and there you go.

I selected parts of the image that I wanted to take over to the background.
 I pasted them and then used the free transform tool to move them where I wanted them.
 Then I just started adding a bunch of them. I selected different sets of leaves, made some bigger and some smaller, and even erased parts of some of the leaves to give them a faded look and give the background texture.
 Next I put the background onto my blog (I'll go into that a little more in a bit), and the white part in the middle was a little too small and the words were spilling over onto the sides. So I opened the background up and added an inch to the width of the canvas.
 Now there is some white space to the side.
 So I used the free transform tool and scooted the whole right half of the background to the right. This works really well because the middle part is white. If it isn't you can try to patch it up by using the rubber stamp tool or something to fill it in.

And now I have a cute fall background.
 Now in order to get the backgrounds onto your blog you need them to have a url, or a web address. If you already have a site to host them, just use that. If not you can open up an account with Photobucket or some similar site. I use Photobucket. Just upload your photos and then copy and past that url into the html code that you're using for your backgrounds. On Photobucket it has a spot that you can just click and it copies the direct link to your clipboard.

 And headers are even easier cause you just upload them straight onto your blog.
You can find a lot more just by searching for "digital scrapbook" on a search engine. If you're not confident in your creativity, lazy, or don't have a lot of time, you can just start off with a blog background someone already made, and then just edit it for your own use. This is what I usually do. My favorite places are:
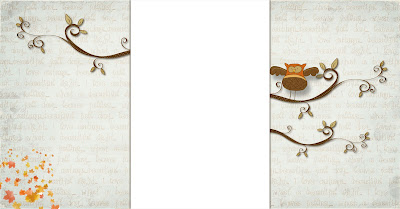
For my fall background this year, I started with this background from shabby blogs.

I liked the owl, but I wanted something with leaves too.
Now, one big problem you're going to run into with some websites, is that they protect their backgrounds from being stolen by only giving you a small version of the picture when you click on it. You can get around this by going through that code that they give you to copy and paste into your blog to get the background onto your blog. There will always be a part of the code that says something like "background image". Look for that and then the link right after that will be the link to your image.

Copy and paste the entire link into your web browser and then from there you can right click on the image and save it to your computer.

Next you want to open the image in what ever editing software you are most comfortable with. I use Photoshop. And I'm not even that good with Photoshop so don't be too intimidated.
Now you have to decide what you want to do to your background. I usually add really simple things like foot prints and flowers.

I just search for images online and then save them to my computer. Try to look for clip art, because the back ground is white and they are easier to work with. Once you have the image open in Photoshop you can change the color, size, transparency, etc. You can even use the image as a template to cut out that shape from your background or from another cute pattern and put it onto your background.
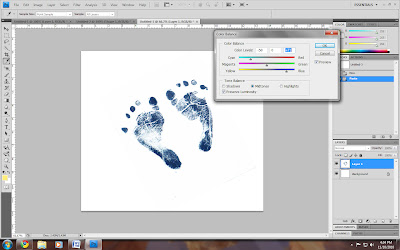
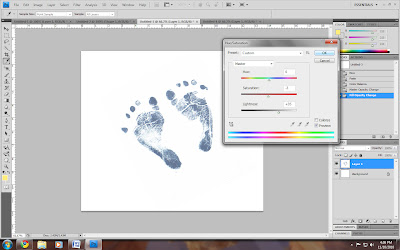
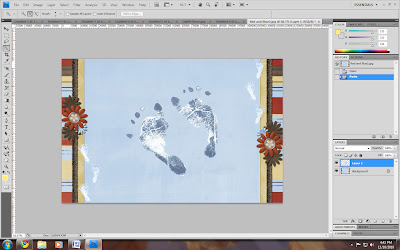
Here is an example of changing size and color. I opened the feet in Photoshop and changed the color. You can click on the pictures and make them larger if you want more details on what is going on. I basically just added some blue in the color balance.
 Then I made them a bit lighter.
 You can use the magic wand tool to select specific things. This is a lot easier than using the lasso tool, you just have to play around with it a bit to get the hang of it. Also you can hold down the shift and alt key to add or subtract to what you've already selected. This makes it so if you make a mistake you don't have to go all the way back to the beginning.
 Then use the free transform operation to make the shape smaller, or tilt it, or move it. You can either press ctrl t, or find it in the tool bar like I've shown here.
And as you can see on this background I've already added some cute little feet on the sides.
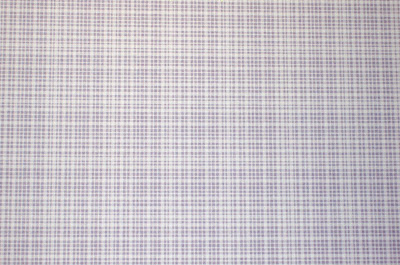
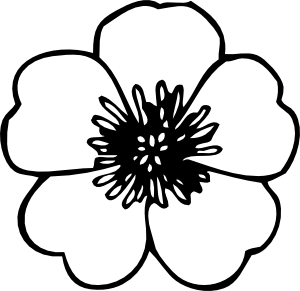
Another thing you can do with the shapes you find is use them as a template. Here is an example of this. I started with this cute pattern.
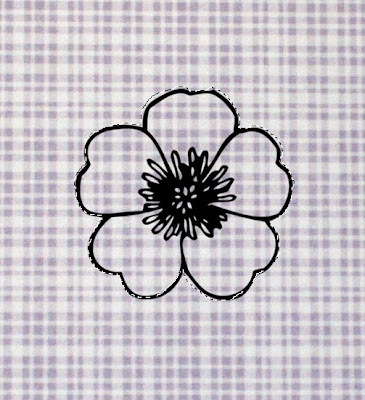
 Then I copied and pasted that flower shape over the top of it. Then I selected the outline of the shape.
 Now, comes the trick. You have to make sure and select the background, your pattern, as the active layer. Then you copy the selection.
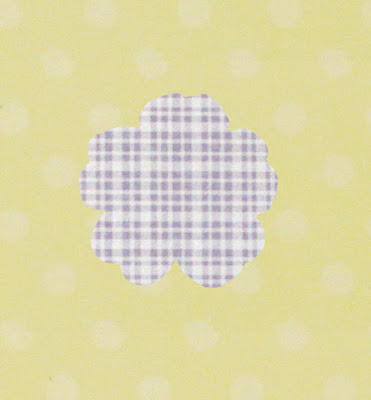
 Now you have that cute flower shape, and it's in a cute pattern too.
 Now we just have to get the center. I used the replace color function to make the flower the same color as the purple in the pattern.
 Then I selected just the middle part.
 Copy and paste it on top of the flower and there you go.
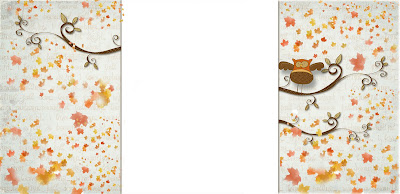
Now, back to our fall background. I wanted to add leaves so I just searched for leaves in an image search and these popped up.


I selected parts of the image that I wanted to take over to the background.
 I pasted them and then used the free transform tool to move them where I wanted them.
 Then I just started adding a bunch of them. I selected different sets of leaves, made some bigger and some smaller, and even erased parts of some of the leaves to give them a faded look and give the background texture.
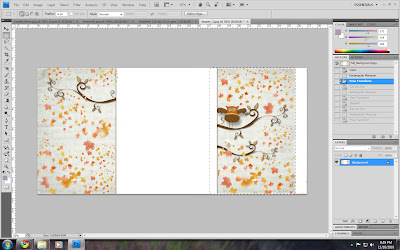
 Next I put the background onto my blog (I'll go into that a little more in a bit), and the white part in the middle was a little too small and the words were spilling over onto the sides. So I opened the background up and added an inch to the width of the canvas.
 Now there is some white space to the side.
 So I used the free transform tool and scooted the whole right half of the background to the right. This works really well because the middle part is white. If it isn't you can try to patch it up by using the rubber stamp tool or something to fill it in.
And now I have a cute fall background.


If you've never used a special background before and you don't know what I'm talking about, you can click here and read a tutorial on how to put cute backgrounds on your blog.
And that's it. Now you can make custom backgrounds for your blog. When you get really good you can try making them from scratch. Don't forget to make yourself a cute header too. You can use more of the same stuff from your background, or you can do something completely different like I did for my fall header.
 And headers are even easier cause you just upload them straight onto your blog.
 Good luck and have fun!
Thanks, Katie. You've inspired me to create a background of my own.
ReplyDeleteWow I just loved your article on the beginners guide to starting a blog. I want to start one and I am now pretty clear after reading this post. This was very helpful for me and I am definitely going to mention you in my blog as soon as I start it. Thanks you so much.
ReplyDeleteRegards: Eve Hunt
Thanks for a great article. When do you know its time to move on to a higher end hosting package? What should you look for? Is it easy to move from shared hosting to another type of service? Thank you!
ReplyDeleteKelly Hubbard
Fantastic tips ! Even there are lot of tutorials on net on how to create website, but this guide is for absolute beginners who want to create their own site. Thanks for sharing dear.
ReplyDeletePaul Brown