Wednesday, April 16, 2014

Easy Easter Treat

I saw a picture of these on Pinterest but these are so cute that I just had to post my own pictures of the process. 
First, I bought some bunny shaped Peeps from the grocery store. I refrigerated them when I got home so they wouldn't be gooey when I cut them apart.
Take a few miniature marshmallows and cut in half to prepare for the final decoration.
Then, insert a sucker stick into each bunny all the way up to the fork in the ears without actually breaking through. Tap them slightly to remove extra sugar and lay them flat on a clean piece of parchment paper.
Melt dipping chocolate using your favorite method. My favorite way is to use this handy dandy Wilton Chocolate Pro. I bought it at JoAnn's with a 50% off coupon.  I use it all the time and it is the easiest way to melt chocolate without burning it. I use a good dipping chocolate called Guittard Dark Chocolate A'Peels that I buy from Orson Gygi. It isn't the quality you would use for soft-centered chocolate candies but tastes much richer than the grocery store Plymouth Pantry chocolate flavored coating that many people use.
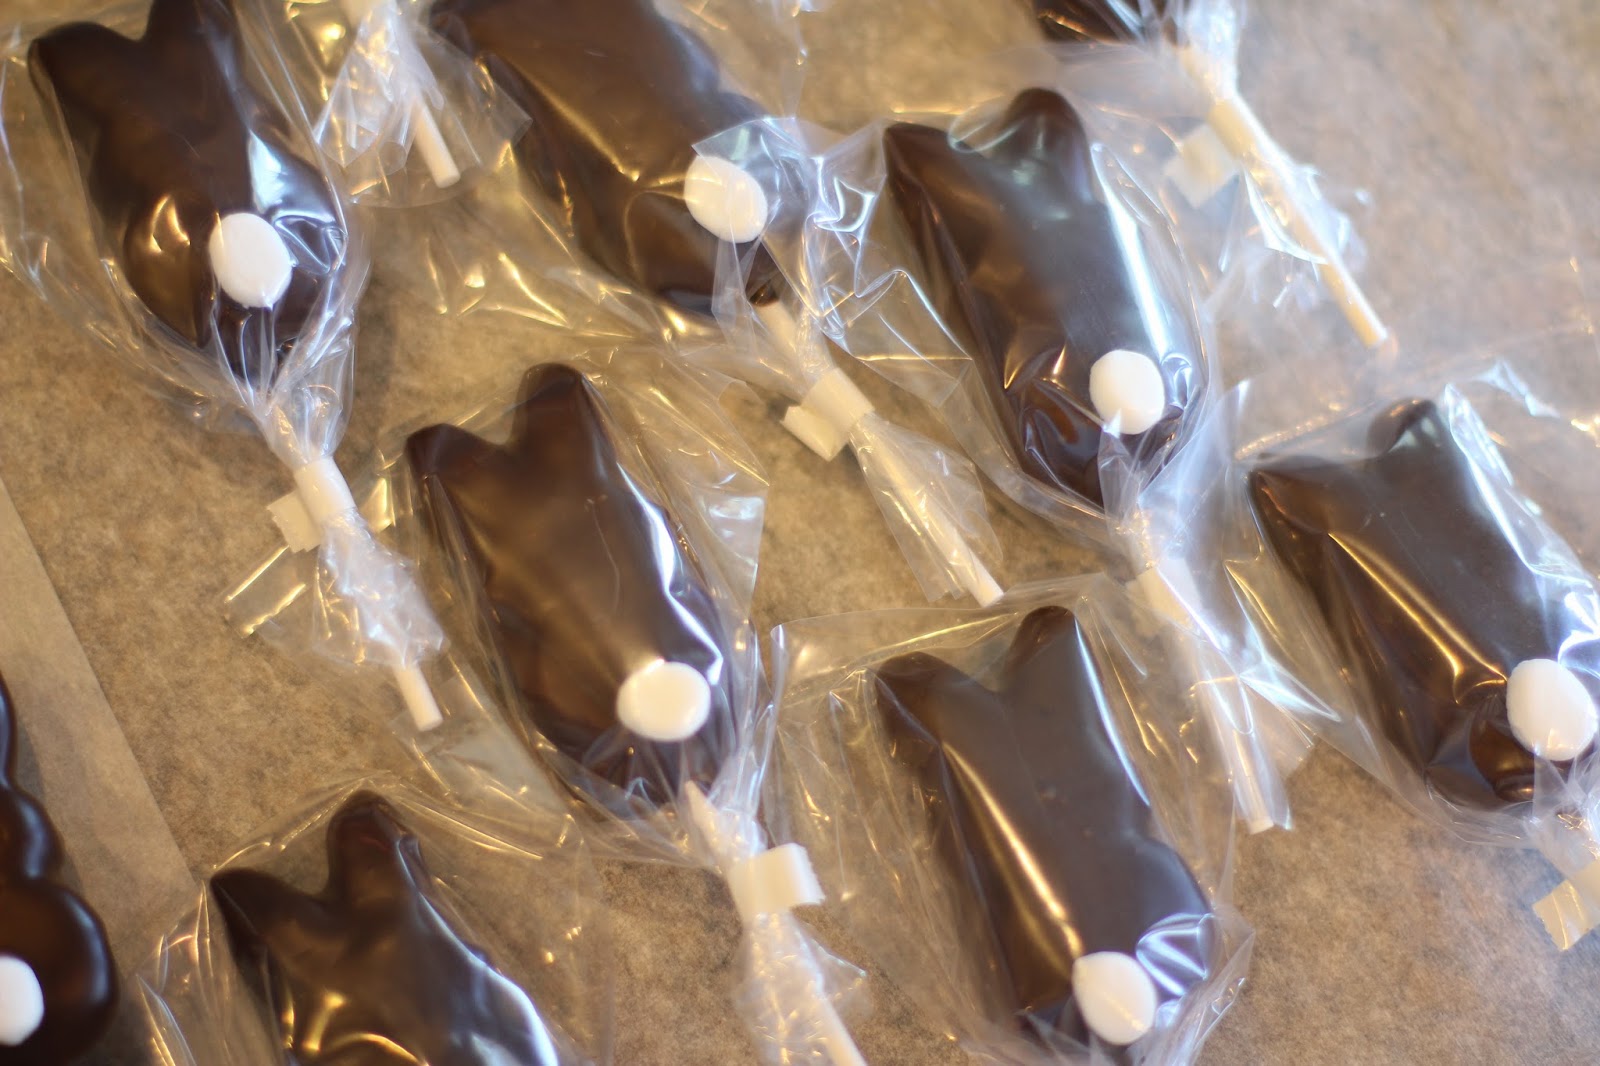
Hold the bunny sucker by the stick end and push it into the melted chocolate, making sure to cover the entire bunny especially at the point the stick enters the bunny. Tap the stick lightly on the edge of the Chocolate Pro so that the extra chocolate drips off into the pan. Move the sucker back and forth slightly until the bunny looks like it is evenly coated, turning as necessary. Lay the bunny on a sheet of parchment paper and immediately press one half of a small marshmallow toward the bottom for a tail.
Let them set until completely cool and hardened. Wrap in plastic sucker bags and secure.
Even though I have used "dark" chocolate, this brand is not bitter at all and the combination with the marshmallow is yummy and the sugar coating on the Peep gives it an extra crunch. So easy and fun.

Friday, August 23, 2013

Best Ever Chocolate Marshmallow-Filled Cupcakes

I love anything chocolate. I found a similar recipe to this one on the internet but after making it last Sunday, I knew it needed some tweaking to make it just perfect. This recipe results in a super moist chocolate cake with an added surprise, chocolate chips. Yum! The marshmallow filling takes it over the top.
Although frosting covers most mistakes, I know what's underneath and love the way these round nicely on the top.
I let them cool in the pan about 10 minutes and then removed them to a cooling rack.
When they are completely cool, I gathered these ingredients to make the marshmallow filling.
This is my second bottle of Mexican vanilla and it's nearly gone. I have a third one waiting in the pantry but you can use regular vanilla extract, NEVER imitation vanilla flavoring.
When the cupcakes are completely cool, you can add the marshmallow filling by scooping out a bit of the cupcake with a small melon baller and putting the filling in a Ziploc® bag with one corner cut out or use my favorite method of putting the filling in a decorating bag fitted with a #230 Bismarck decorating tip.  I like this method better because I can give the bag a lot of pressure and get lots of filling in the cupcake and it makes the cupcake rise a bit. It's o.k. if it seeps out at the top because the frosting will cover this.
The frosting has a very rich chocolate taste and is thick enough that it pipes nicely and keeps its shape.
This was so good. I quickly ate the other half after taking this picture.
Hope you enjoy this recipe. I will definitely make it again and again.

Cupcake:
1¼ cups flour
½ cup baking cocoa
¾ tsp. soda
¼ tsp. salt
1 cup sugar
⅓ cup vegetable oil
1 egg
1 tsp. vanilla extract
¾ cup buttermilk
⅔ cup semisweet chocolate chips

Marshmallow Filling:
½ cup butter
1 cup Kraft Jet-Puffed Marshmallow Creme
1½ cups powdered sugar

Chocolate Buttercream Frosting:
¾ cup butter, room temperature (1½ sticks)
¾ cup baking cocoa
2 tsp. vanilla extract
3½ cups powdered sugar
3-4 Tbsp. whipping cream, half 'n half, or milk

Cupcake:
Combine flour, baking cocoa, soda, salt and sugar in small bowl. Set aside. In mixing bowl, beat together oil, egg and vanilla extract. Add dry ingredients alternately with buttermilk. Beat until well mixed. Fold in chocolate chips.

With #20 ice cream scoop, divide batter among 12 cupcake liners. Bake for 18 minutes at 350º (works well for my elevation in Utah) or until toothpick inserted comes out clean. Remove from oven and cool completely.

Marshmallow Filling:
Combine butter and marshmallow creme and beat until smooth. Slowly add powdered sugar and mix well. With #230 Bismarck tip fill cupcakes with marshmallow mixture.

Chocolate Buttercream Frosting:
Mix baking cocoa and 2 cups powdered sugar in small bowl. Set aside. Beat butter in mixing bowl for 2 minutes. Slowly add cocoa-powdered sugar mixture, vanilla, whipping cream and additional powdered sugar (totaling 3½ cups sugar). Beat until well mixed. Pipe onto cupcakes.

I used an Ateco #825 tip but a Wilton 1M works well too and may be easier to find at JoAnn's or WalMart.

Saturday, February 16, 2013

Keeping Brown Sugar Soft

I hesitate to even post this as this seems obvious to me and probably to everyone else, but I keep seeing blogs that talk about putting an apple or piece of bread into your brown sugar container to keep it soft. So evidently it is not that obvious to everyone. I used to keep my brown sugar in this Tupperware® container.
Yes, I know, this is probably worth something as an antique now. I would fill it to the top, but as I would use the brown sugar it would create a little bit of air space each time and I would notice that it would slowly dry out. By the time there was just a bit of brown sugar left, it was pretty hard and dry.

Then one day I asked myself this question, why does brown sugar stay soft in its original package that I can leave in my food storage room for months or even years? So, that was the obvious answer to this dilemma--keep it in its own package. So as you use your brown sugar, fold down the top of the original plastic bag, pressing out all air. Keep it folded down with a piece of masking tape. I use painter's tape as it's easier to pull off.
Then place the entire bag with the folded top down inside a Ziploc® bag, press out all the air and zip it up.
Then when I place the bag of brown sugar in my cupboard I fold over any extra Ziploc® bag underneath.
My brown sugar stays absolutely soft until I use the very last bit, and I don't use it up all that fast. This sugar was opened a long time ago.

Best Way to Slice Bread

I've been making my own bread for decades. Yes, that does age me a bit. I used to freeze the loaves of bread for several hours and then slice them with a bread knife. Sometimes I froze them too long and it was hard to cut through. Sometimes they weren't frozen enough and my knife would squish the bread as I sliced it. Then I started using my Bosch food slicer.
It did an o.k. job but often would leave a jagged edge along one side of the bread and then would pulverize the last few slices. It was a mess to clean up as well with crumbs hidden in all the crevices of the machine. I even considered buying a commercial bread slicer.
After all, my bread just had to look like it was NOT homemade but a smoothly sliced rounded loaf of perfection. But even the $1500 price tag for a used machine was a bit too much for me and then I'd have to leave it in the garage with the mess and then all sorts of creatures would get into it and eat the crumbs. The thought of it made me sick.

So then one day a neighbor brought me a loaf of her homemade bread and we got to talking about baking our own bread and how we sliced it.  She used her electric knife. What? Why didn't I think of that? She didn't have to freeze it or anything. I could have saved myself all sorts of stress throughout the years. And so, that's how I slice my bread.
It works perfectly. Sometimes a solution is so simple, you just don't ever discover it until way too late.

Friday, February 1, 2013

What Makes Cupcakes Go Flat?

Look at these two cupcakes. They were made from the same batter, the batter was measured with the same ice cream scoop, they were placed into the same cupcake liners, and they were baked along side one another at the same time in the same oven. What made one sink and overflow and look ugly while the other formed a perfect dome?
The PAN!!! They were baked in the same Chicago Metallic brand muffin pan, but the pan on the left was purchased about 25 years ago and the pan on the right was purchased a week ago.
That is why I have been having such trouble getting my cupcakes looking decent, thus requiring me to fill up the sunken centers with icing. But the cupcakes on the right are a bit too done for my liking, so I will have to bake them for less time and then they'll be perfect. So, a lesson to you is check your PAN to see if that is what is giving you all the trouble.

I have since purchased another Chicago Metallic muffin pan and I am putting the other muffin pans into storage. Perhaps one day they will be collector's items.

Tuesday, January 29, 2013

I Spy Bag (Tutorial)

Materials Needed:
¼ yard woven material (I used twill)
Fusible interfacing
6 x 6-inch piece of heavy vinyl (bought at WalMart or Jo-Anns)
9-10 oz. Poly Pellets® weighted stuffing material (bought at Jo-Anns)
Miniature items to place in bag (around 28 or so)
Iron-On Quick Fuse™ fabric sheets (bought at Jo-Anns)
Thread
FrayCheck™ (available at WalMart, Jo-Anns or fabric store)
Invisible marking pen
Pins

1. Cut two pieces of 8 x 8-inch square fabric.
2. Cut two pieces of 8 x 8-inch square fusible interfacing and fuse to wrong side of each fabric piece. Since I decided to use twill, this made it more stable and less likely to fray. You can skip this step if your fabric seems sturdy enough to stand on its own.
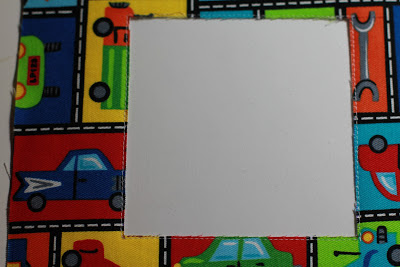
3. On the right side of one piece of fabric mark a line with a disappearing marking pen 2 inches from each side, forming a 4 x 4-inch square. With a rotary cutter cut along the lines, being careful not to cut  too close to the corners. Finish cutting the corners with a sharp scissors. You can cut a smaller square if you want to make it harder to "spy" inside the bag or you can cut out a different shape such as a circle, heart, star, diamond, etc.
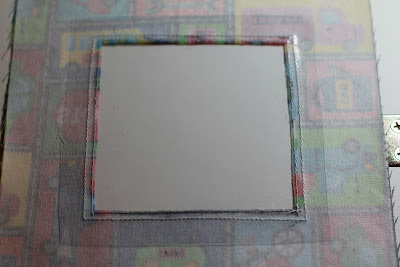
4. Center the vinyl under the fabric with the 4 x 4-inch cutout placed right side up and secure in place with pins or Scotch® tape. I preferred Scotch® tape placed underneath the fabric at two of the four corners of the vinyl so that the fabric would lie flat. Do not place tape on any of the vinyl that will show in the window as the residue will be difficult to remove.
5. Stitch close to the edges around all four sides of the window opening and secure stitching with backstitch at the end. Stitch again about ¼ inch away forming a double row of stitching. Treat innermost edge of fabric with FrayCheck™to stop the fabric from fraying and wipe the residue from vinyl with tissue before it dries. Trim away excess vinyl. If you prefer, you can stitch around the opening with a small zig-zag or appliqué type stitch that will finish the edge and skip the FrayCheck™.


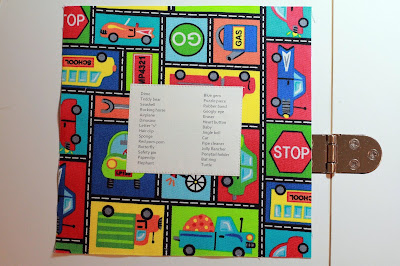
6. Type a list of items to be included inside the bag and follow directions to prepare a Quick Fuse™ fabric sheet. I had 28 items, but you can have more or less. Just remember that the larger the items are and the more you have of them, the less pellets you will be able to fit into your bag and the easier it will be to "spy" and find them.
An 8½ x 11-inch Quick Fuse™fabric sheet will make several lists if you want to make more than one bag. After printing on the fabric sheet, allow it to dry 1-2 minutes. Trim around image, leaving a border for stitching the list to the back piece of fabric. Preheat iron to medium/high (cotton) setting. NO STEAM. Place image face UP on right side of back piece and press 10-15 seconds making sure all areas of the sheet are thoroughly fused.

7. Stitch around edge of the list with decorative or straight stitch to secure.
8. Pin front and back pieces of bag with right sides together and stitch ½-inch seams around three sides, leaving the fourth side open for turning.
9. Clip corners and turn inside out.
10. Fill with miniature items, checking with the list for accuracy. Fill the bag ⅔ full with Poly Pellets®. I used about 2 level cups which weighed about 9-9½ oz. The more pellets you use, the harder the items will be to find.
11. Fold down ½-inch seam allowance on open end and stitch close to the edge, being very careful not to sew over the pellets so you don't break a needle. Sew around the edges of the other three sides to secure the seams and help the bag lie flat.
Voila! You're done.

Sunday, January 27, 2013

Make Your Own Dog Potty

If you have to have the best dog potty and often go over the top in getting just what you want then read on. If you want to do things the cheapest way possible, then skip this post and just go to Petco or Petsmart and buy one.

I have spent hours on the internet trying to find the very best dog potty for Zsa Zsa since I am trying to baby her after her bout with congestive heart failure. Most of the ones I found were too small for two dogs to use at the same time and since Zsa Zsa has a sister, Sasha, this was an important consideration. Since I now have to take Zsa Zsa out 7-8 times a day and must descend 16 stair steps down and outside to the potty and then back up again, I didn't want to take Sasha out an additional 4 times by herself. After all, my knees aren't in the greatest of shape and I need to baby them too.

On the internet I found a few larger dog potties that looked pretty nice but they were pretty pricey, over $100 and the grass on them didn't look that natural, and I never found one as large as what I ended up with. The solution was to spend a lot of time and research to build the perfect dog potty myself.

First, you need a base to hold a piece of sod or artificial turf where the pee is going to collect. Yes, that sounds a bit graphic but essential. I first bought a GE 30 x 32 x 2-inch washer pan from Home Depot for $22. It was o.k. but when I got it home and started looking at it, I couldn't picture two dogs doing their duty on it at the same time. It seemed a bit small. But I didn't have any other promising options at the time so I kept it while continuing to shop.

Next I needed a piece of good looking sod. Home Depot had some artificial turf that was unbelievably realistic and so nice I wouldn't mind having it in my family room as it was so soft but I had to buy a minimum of a 15-foot wide roll and I needed 3 feet wide so I would end up with 45 square feet at $3.99 per square foot. For a total of $179 resulting in enough sod for 5 dog potties, I couldn't justify the expense. I kept looking and took the chance on ordering this over the internet from Amazon, a piece of 36 x 36-inch Incase brand artificial turf. Yep, I know, $54 bucks. The doggies are worth it. But it actually turned out to be pretty nice, soft and fairly thick and realistic. It didn't have the thatch look like the Home Depot stuff but since I needed a smaller piece than a roll of 15-foot sod, I had to pay the price. The ideal thing would have been to find a remnant of a job done locally but I also tried that and couldn't get anyone to call me back.

So now I had a 36 x 36-inch piece of sod I liked but a 30 x 32-inch washer pan that would require me to trim the sod. Ouch, after I paid $6 a square foot for it, I couldn't do that so I later found this larger 38 x 38 x 2-inch Diversitech plastic condensate drain pan on the internet. Notice the white PVC drain at the right. We'll talk about that later.

It just happened that Grainger had a local store so I called them and they had one left in stock. Since I was the only woman in the store, the guy helping me at the counter wondered why I needed it and he seemed a bit bewildered when I told him I was making a dog potty. On the way home, I returned the 30 x 32-inch washer pan to Home Depot.

Next was finding some kind of layer of something that would hold the fake turf above the bottom of the pan so the grass wouldn't sit directly in the pee. After all, most dogs don't want to wade in sopping wet grass. I first considered these Pooch Pads for the base as you can wash and reuse them over and over again but they are quite expensive and although I will spare no expense for my dogs, this seemed a bit over doing it. I may, however, consider it in the future if the present configuraton results in rust and gets yucky. So back to Home Depot where I found this metal lath. It wasn't quite wide enough for my pan but the price was right at $7 and since it was 8 feet long I ended up cutting two pieces with my tin snips and overlapping them.

With the metal lath all nicely trimmed and laying in the pan, I put in the artificial turf and it was a perfect fit as the inside dimensions of the 38 x 38-inch pan were 36 x 36 inches. Voila!
Now about the white PVC drain that you see on the right. Notice that I have lined it up to the very edge of the deck. When the pee gets high enough to reach the drain, it will just spill over the edge to the grass below. To clean it, I can take a pitcher of water and rinse it out, tip it slightly and it will dump over as well. Hopefully no one will be walking under the deck at the same time.

If I become overly ambitious this summer, I may actually add a PVC pipe down to the lower patio and spare the possibility of anyone getting dumped on.